NEW_HTTP_SERVER_2.4

NEW_HTTP_SERVER_2.4

New features in Apache HTTP Server 2.4


  • Core Enhancements


    • Run-time Loadable MPMs
    • Event MPM
    • Asynchronous support
    • Per-module and per-directory LogLevel configuration
    • Per-request configuration sections
    • General-purpose expression parser
    • KeepAliveTimeout in milliseconds
    • NameVirtualHost directive
    • Override Configuration
    • Config file variables
    • Reduced memory usage


  • Module Enhancements


    • mod_ssl
    • mod_proxy
    • mod_proxy_balancer
    • mod_cache
    • mod_include
    • mod_cgi, mod_include, mod_isapi
    • mod_authz_core
    • mod_rewrite
    • mod_ldap, mod_authnz_ldap
    • mod_info
    • mod_auth_basic


  • Documentation


    • mod_rewrite
    • mod_ssl
    • Caching Guide


  • New Modules


    • mod_proxy_fcgi
    • mod_proxy_scgi
    • mod_proxy_express
    • mod_remoteip
    • mod_heartmonitor, mod_lbmethod_heartbeat
    • mod_proxy_html
    • mod_sed
    • mod_auth_form
    • mod_session
    • mod_allowmethods
    • mod_lua
    • mod_log_debug
    • mod_buffer
    • mod_data
    • mod_ratelimit
    • mod_request
    • mod_reflector
    • mod_slotmem_shm
    • mod_xml2enc
    • mod_macro
    • mod_proxy_wstunnel
    • mod_authnz_fcgi mod_http2
    • mod_proxy_hcheck


  • Program Enhancements


    • fcgistarter
    • htcacheclean
    • rotatelogs
    • htpasswd, htdbm


Core Enhancements

Run-time Loadable MPMs
Multiple MPMs can now be built as loadable modules at compile time. The MPM of choice can be configured at runtime via LoadModule directive.
./configure --enable-mpms-shared=all
 
Event MPM
The Event MPM is no longer experimental but is now fully supported.
  This original goal of this MPM was to fix the 'keep alive problem' in HTTP. After a client completes the first request, it can keep the connection open, sending further requests using the same socket and saving significant overhead in creating TCP connections.
 
Asynchronous support
Better support for asynchronous read/write for supporting MPMs and platforms.
 
Per-module and per-directory LogLevel configuration
The LogLevel can now be configured per module and per directory. New levels trace1 to trace8 have been added above the debug log level.
Syntax:    LogLevel [module:]level [module:level] …
Default:    LogLevel warn
 
Per-request configuration sections
<If>, <ElseIf>, and <Else> sections can be used to set the configuration based on per-request criteria.
Example: – The <ElseIf> would match if the remote address of a request belongs to the subnet 10.0.0.0/8 but not to the subnet 10.1.0.0/16
<If "-R '10.1.0.0/16'">
  #…
</If>
<ElseIf "-R '10.0.0.0/8'">
  #…
</ElseIf>
<Else>
  #…
</Else>
Next Example:-
# ensure that mod_include is loaded
<IfModule !include_module>
  Error "mod_include is required by mod_foo.  Load it with LoadModule."
</IfModule>
General-purpose expression parser
A new expression parser allows to specify complex conditions using a common syntax in directives like SetEnvIfExpr, RewriteCond, Header, <If>, and others.
 
KeepAliveTimeout in milliseconds
It is now possible to specify KeepAliveTimeout in milliseconds.
The number of seconds Apache httpd will wait for a subsequent request before closing the connection. By adding a postfix of ms the timeout can be also set in milliseconds. Once a request has been received, the timeout value specified by the Timeout directive applies.
Setting KeepAliveTimeout to a high value may cause performance problems in heavily loaded servers.
Syntax: KeepAliveTimeout num[ms]
Default: KeepAliveTimeout 5
Example:- KeepAliveTimeout 5
 
NameVirtualHost directive
No longer needed and is now deprecated.
Override Configuration
When this directive is set to None and AllowOverride is set to None, then .htaccess files are completely ignored. In this case, the server will not even attempt to read .htaccess files in the filesystem.
Example:
AllowOverride None
AllowOverrideList Redirect RedirectMatch
In the example above, only the Redirect and RedirectMatch directives are allowed. All others will cause an Internal Server Error.
Config file variables
It is now possible to Define variables in the configuration, allowing a clearer representation if the same value is used at many places in the configuration.
Reduced memory usage
Despite many new features, 2.4.x tends to use less memory than 2.2.x.

New Modules

mod_proxy_fcgi
FastCGI Protocol backend for mod_proxy
Example:-
        ProxyPass "/myapp/" "fcgi://localhost:4000/"
You have to enable mod_proxy and mod_proxy_fcgi.
mod_proxy_scgi
SCGI Protocol backend for mod_proxy
            Example:-
                               ProxyPass "/scgi-bin/" "scgi://localhost:4000/"
You have to enable mod_proxy and mod_proxy_scgi.
mod_proxy_express
Provides dynamically configured mass reverse proxies for mod_proxy
 
mod_remoteip
Replaces the apparent client remote IP address and hostname for the request with the IP address list presented by a proxy or a load balancer via the request headers.
Syntax:            RemoteIPHeader header-field
Context:          server config, virtual host
mod_heartmonitor, mod_lbmethod_heartbeat
Allow mod_proxy_balancer to base load balancing decisions on the number of active connections on the backend servers.
Syntax:            HeartbeatListenaddr:port
Default:           disabled
Context:          server config
Example:-
HeartbeatListen 239.0.0.1:27999
mod_proxy_html
Formerly a third-party module, this supports fixing of HTML links in a reverse proxy situation, where the backend generates URLs that are not valid for the proxy's clients.
mod_sed
An advanced replacement of mod_substitute, allows editing the response body with the full power of sed.
Adding an output filter
# In the following example, the sed filter will change the string
# "monday" to "MON" and the string "sunday" to SUN in html documents
# before sending to the client.
<Directory "/var/www/docs/sed">
    AddOutputFilter Sed html
    OutputSed "s/monday/MON/g"
    OutputSed "s/sunday/SUN/g"
</Directory>
Adding an input filter
# In the following example, the sed filter will change the string
# "monday" to "MON" and the string "sunday" to SUN in the POST data
# sent to PHP.
<Directory "/var/www/docs/sed">
    AddInputFilter Sed php
    InputSed "s/monday/MON/g"
    InputSed "s/sunday/SUN/g"
</Directory>
mod_auth_form
Enables form-based authentication.
 
mod_session
Enables the use of session state for clients, using cookie or database storage.
 
mod_allowmethods
New module to restrict certain HTTP methods without interfering with authentication or authorization.
Example:-
                  <Location /> 
AllowMethods GET HEAD
</Location>

mod_lua

Embeds the Lua language into httpd, for configuration and small business logic functions. (Experimental)

mod_log_debug

Allows the addition of customizable debug logging at different phases of the request processing.

mod_buffer

Provides for buffering the input and output filter stacks

mod_data

Convert response body into an RFC2397 data URL

mod_ratelimit

Provides Bandwidth Rate Limiting for Clients

Example:-
       <Location /downloads> 
SetOutputFilter RATE_LIMIT 
SetEnv rate-limit 400
</Location>
Note – rate-limit is in KiB/s

mod_request

Provides Filters to handle and make available HTTP request bodies

mod_reflector

Provides Reflection of a request body as a response via the output filter stack.

mod_slotmem_shm

Provides a Slot-based shared memory provider (ala the scoreboard).

mod_xml2enc

Formerly a third-party module, this supports internationalization in libxml2-based (markup-aware) filter modules.

mod_macro (available since 2.4.5)

Provide macros within configuration files.

mod_proxy_wstunnel (available since 2.4.5)

Support web-socket tunnels.

mod_authnz_fcgi (available since 2.4.10)

Enable FastCGI authorizer applications to authenticate and/or authorize clients.

mod_http2 (available since 2.4.17)

Support for the HTTP/2 transport layer.

mod_proxy_hcheck (available since 2.4.21)

Support independent dynamic health checks for remote proxiy backend servers.


Module Enhancements

mod_ssl

mod_ssl can now be configured to use an OCSP server to check the validation status of a client certificate. The default responder is configurable, along with the decision on whether to prefer the responder designated in the client certificate itself.

mod_ssl now also supports OCSP stapling, where the server pro-actively obtains an OCSP verification of its certificate and transmits that to the client during the handshake.

mod_ssl can now be configured to share SSL Session data between servers through memcached

EC keys are now supported in addition to RSA and DSA.

Support for TLS-SRP (available in 2.4.4 and later).

mod_proxy

The ProxyPass directive is now most optimally configured within a Location or LocationMatch block, and offers a significant performance advantage over the traditional two-parameter syntax when present in large numbers.

The source address used for proxy requests is now configurable.

Support for Unix domain sockets to the backend (available in 2.4.7 and later).

mod_proxy_balancer

More runtime configuration changes for BalancerMembers via balancer-manager

Additional BalancerMembers can be added at runtime via balancer-manager

Runtime configuration of a subset of Balancer parameters

BalancerMembers can be set to 'Drain' so that they only respond to existing sticky sessions, allowing them to be taken gracefully offline.

Balancer settings can be persistent after restarts.

mod_cache

The mod_cache CACHE filter can be optionally inserted at a given point in the filter chain to provide fine control over caching.

mod_cache can now cache HEAD requests.

Where possible, mod_cache directives can now be set per directory, instead of per server.

The base URL of cached URLs can be customized, so that a cluster of caches can share the same endpoint URL prefix.

mod_cache is now capable of serving stale cached data when a backend is unavailable (error 5xx).

mod_cache can now insert HIT/MISS/REVALIDATE into an X-Cache header.

mod_include

Support for the 'onerror' attributes within an 'include' element, allowing an error document to be served on error instead of the default error string.

mod_cgi, mod_include, mod_isapi, …

Translation of headers to environment variables is more strict than before to mitigate some possible cross-site-scripting attacks via header injection. Headers containing invalid characters (including underscores) are now silently dropped. Environment Variables in Apache has some pointers on how to work around broken legacy clients which require such headers. (This affects all modules which use these environment variables.)

mod_authz_core Authorization Logic Containers

Advanced authorization logic may now be specified using the Require directive and the related container directives, such as <RequireAll>.

mod_rewrite

mod_rewrite adds the [QSD] (Query String Discard) and [END] flags for RewriteRule to simplify common rewriting scenarios.

Adds the possibility to use complex boolean expressions in RewriteCond.

Allows the use of SQL queries as RewriteMap functions.

mod_ldap, mod_authnz_ldap

mod_authnz_ldap adds support for nested groups.

mod_ldap adds LDAPConnectionPoolTTL, LDAPTimeout, and other improvements in the handling of timeouts. This is especially useful for setups where a stateful firewall drops idle connections to the LDAP server.

mod_ldap adds LDAPLibraryDebug to log debug information provided by the used LDAP toolkit.

mod_info

mod_info can now dump the pre-parsed configuration to stdout during server startup.

mod_auth_basic

New generic mechanism to fake basic authentication (available in 2.4.5 and later).


Program Enhancements

fcgistarter

New FastCGI daemon starter utility

htcacheclean

Current cached URLs can now be listed, with optional metadata included.

Allow explicit deletion of individual cached URLs from the cache.

File sizes can now be rounded up to the given block size, making the size limits map more closely to the real size on disk.

Cache size can now be limited by the number of inodes, instead of or in addition to being limited by the size of the files on disk.

rotatelogs

May now create a link to the current log file.

May now invoke a custom post-rotate script.

htpasswd, htdbm

Support for the bcrypt algorithm (available in 2.4.4 and later).


Documentation

mod_rewrite

The mod_rewrite documentation has been rearranged and almost completely rewritten, with a focus on examples and common usage, as well as on showing you when other solutions are more appropriate. The Rewrite Guide is now a top-level section with much more detail and better organization.

mod_ssl

The mod_ssl documentation has been greatly enhanced, with more examples at the getting started level, in addition to the previous focus on technical details.

Caching Guide

The Caching Guide has been rewritten to properly distinguish between the RFC2616 HTTP/1.1 caching features provided by mod_cache, and the generic key/value caching provided by the socache interface, as well as to cover specialized caching provided by mechanisms such as mod_file_cache.


Take reference from apache.org


Network Teaming RHEL/CentOS 7

Network Teaming RHEL/CentOS 7

How to Configure Network Teaming in RHEL/CentOS 7

When a system administrator wants to increase the bandwidth available, provide redundancy, and load balancing for data transfers, a kernel feature known as network bonding allows getting the job done in a cost-effective way.


To configure Teaming, need at least two NIC.

Check NIC details using command[s] ( using ifconfig, ip addr… ).

[root@feenixdv ~]# cat /proc/net/dev
Inter-|   Receive
 face |bytes   
enp0s3:   24307
enp0s8:    4089
enp0s9:    3310
 
In my example enp0s3, enp0s8 and enp0s9 are network interfaces.
enp0s3 is primary interface so in this example I am going to create “team0” with enp0s8 and enp0s9.
Using “nmtui” command, we can create teaming in very simple way.

[root@feenixdv ~]# nmtui


Step 1:- Edit connection.
Step 2:- Add new connection.
Step 3:- Select team from list and click on create.
Step 4:- Select add to add NIC interface.

Step 5:- Select interface.
Step 6:- Put NIC details (see ifconfig details for NIC name).
Step 7:- Add interface one by one.
Step 8:- Finally done.

Assign IP to interface (Team0).

[root@feenixdv ~]# nmcli connection modify Team0 ipv4.method manual ipv4.addresses 192.168.1.100/24 connection.autoconnect yes

Activate interface.

[root@feenixdv ~]# nmcli connection up Team0
Connection successfully activated (D-Bus active path: /org/freedesktop/NetworkManager/ActiveConnection/9)

Check IP details.

[root@feenixdv ~]# ifconfig
.
.
team0: flags=4163<UP,BROADCAST,RUNNING,MULTICAST>  mtu 1500
        inet 192.168.1.100  netmask 255.255.255.0  broadcast 192.168.1.255
.
.

Check ping.

[root@feenixdv ~]# ping 192.168.1.100
PING 192.168.1.100 (192.168.1.100) 56(84) bytes of data.
64 bytes from 192.168.1.100: icmp_seq=1 ttl=64 time=0.029 ms
64 bytes from 192.168.1.100: icmp_seq=2 ttl=64 time=0.078 ms
RHEL 7 Article

RHEL 7 Article

ACCESS CONTROL LIST (ACL)

We assign permission to the specific file to providing security, but still it has some limitation just like if we set 777 permission for a file, it set for all the user, but now if we have a need that just user1 can execute the file then it will be problematic so we cannot assign different permissions for different users so ACL comes in.

Now we set permission for file.txt

1st we create “file.txt” in “/tmp” directory then set ACL with “setfacl” command where m ( modify ) u (user name) then permission and location of a file.

clip_image001

How to see ACL list. We have “getfacl command”

clip_image002

Through ACL we give permission to ram user to modify the file.

Check how it’ work

clip_image003

It’s working.

To remove ACL

clip_image004


Analyzing past System performance

image Analyzing past System performance of a Linux server
Case
Today's date is 17th Dec 2012.
You are asked to check the System performance of a Linux server on 7th Dec,2012 between 1 AM to 5 AM.

# To check CPU utilization
# sar -u -f /var/log/sa/sa07 -s 01:00:01 -e 05:00:01

… # To check Memory status
#sar -r -f /var/log/sa/sa07 -s 01:00:01 -e 05:00:01

# To check Load average
#sar -q -f /var/log/sa/sa07 -s 01:00:01 -e 05:00:01

# To check Network status
#sar -n DEV -f /var/log/sa/sa07 -s 01:00:01 -e 05:00:01

Apache Monitoring

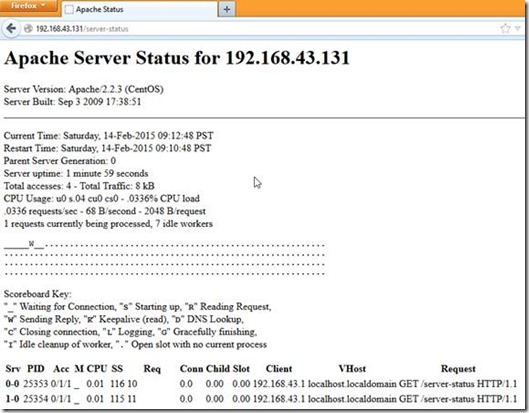
mod_status:-image


The Status module allows a server administrator to find out how well their server is performing. An HTML page is presented that gives the current server statistics in an easily readable form. If required this page can be made to automatically refresh (given a compatible browser). Another page gives a simple machine-readable list of the current server state.

The details given are:

  • The number of worker serving requests
  • The number of idle workers
  • The status of each worker, the number of requests that the worker has performed and the total number of bytes served by the worker
  • A total number of accesses and byte count served
  • The time the server was started/restarted and the time it has been running for
  • Averages giving the number of requests per second, the number of bytes served per second and the average number of bytes per request
  • The current percentage CPU used by each worker and in total by Apache
  • The current hosts and requests being processed

How do I configure mod_status to display Apache web server status?

Enable/uncomment mod_status.so module

# vi httpd.conf

clip_image002

Enable/uncomment “ServerSignature”

 clip_image004

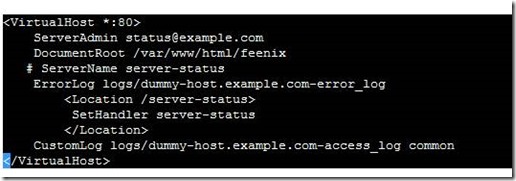
Create virtual section

 clip_image006

Restart apache service

clip_image008

Access apache status in a web browser

clip_image010

Autofs

Autofs

Configuration for USB mass storage, DVD, CDROM, IDE hard drives. Now drives are automatically mounted when you try to access them. You can test it by inserting a cdrom, and cd /mnt/auto/autofs/cdrom . The CDROM is automatically mounted, and ls should show you the contents of the cd.

autofs uses /etc/auto.master and /etc/auto.misc file.

Example:-

We want to auto mount CDROM when we list “/mnt” directory(ls /mnt).

Put “/mnt    /etc/auto.misc” line in “/etc/auto.master” file.

clip_image001

Then edit “/etc/auto.misc”

clip_image002

Restart service

clip_image003

Check directory

clip_image004

Create Partition

How to create a partition

image_thumb[3]

image_thumb[6]

image_thumb[11]

image_thumb[15]

image_thumb[19]

image_thumb[23]

CRON JOB


We put a small script in a cron job and change permission to execute.

clip_image001

Now modify cron job using “crontab –e”.

clip_image002

clip_image003

This script run every one minute.

clip_image004

As per script, we can see it’s updated in every one minute.

clip_image005

Some example:-

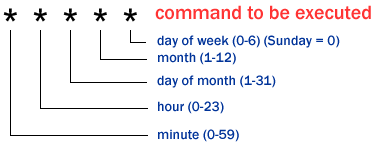
00 09-18 * * 1-5

  • 00 – 0th Minute (Top of the hour)
  • 09-18 – 9 am, 10 am,11 am, 12 am, 1 pm, 2 pm, 3 pm, 4 pm, 5 pm, 6 pm
  • * – Every day
  • * – Every month
  • 1-5 -Mon, Tue, Wed, Thu, and Fri (Every Weekday)
00 09-18 * * *
  • 00 – 0th Minute (Top of the hour)
  • 09-18 – 9 am, 10 am,11 am, 12 am, 1 pm, 2 pm, 3 pm, 4 pm, 5 pm, 6 pm
  • * – Every day
  • * – Every month
  • * – Every day of the week

 Unable to change the password for any user

If we are unable to change the password for any user or during login always asking for password and then force to change the password ( after changing automatic logout ) then check below points.

  • Reboot server in rescue mode(chroot…) and try to change the password or check “/etc/fstab” file.
  • If chroot not working and your partition in LVM then try to 1st activate LVM by below command.


    # lvm vgchange -a y

  • After that mount root partition ( / ) on any directory and check “/etc/fstab” file, maybe root partition ( / ) commented. uncomment it and reboot it.
  • After that reboot. Now you can change the password and also login into the server.

Record Terminal Session in Linux

ttyrec is a tty(terminal) recorder in Unix like operating system & recorded data can be played back with the help of ttyplay command.ttyrec is just a derivative of script command for recording timing information with microsecond accuracy as well. It can record emacs -nw, vi, lynx, or any programs running on tty.

Continue reading

Systemctl command Use in RHEL7

Systemctl command Use in RHEL7

systemctl command

In Red Hat Enterprise Linux 7, process ID 1 is systemd, the new init system. A few features provided by systemd include:

• Parallelization capabilities, which increase the boot speed of a system.

• On-demand starting of daemons without requiring a separate service.

• Automatic service dependency management, which can prevent long timeouts, starting a network service when the network is not available.

• A method of tracking related processes to gather by using Linux control groups.


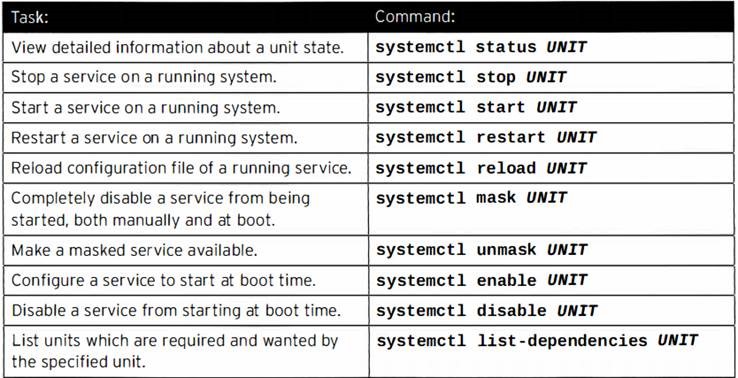
Service states using systemctl command

The status of a service can be viewed with systemctl status name.

clip_image002


Investigate  any  units which are  in  a  failed  or  maintenance  state.  Optionally, add the -l option to show the full output.

clip_image004

Enable or disable service (chkconfig use in lower version of RHEL)

clip_image006

View only failed services.

clip_image007

View the enabled and dis abled settings for all units.  Optionally, limit the type of unit.

clip_image008

Start/stop/restart Services

Status

clip_image009

Stop

clip_image010

Start

clip_image011

Restart/reload

clip_image012

List all dependency of ant services

clip_image013

Masking services

At time s, a system may have conflicting services installed. For example, there are multiple methods to manage networks (network and Network Manager) and firewalls (iptables and firewalld). To prevent an admin iterator from accident tally  starting a  service, that service may be masked.  Masking will create a link in the configuration directories so that if  the service  is started, nothing  will  happen.

clip_image014

Un-Masking services

clip_image015


clip_image017


How to change interface name in RHEL-7 (enp…. To eth0)

How to change interface name in RHEL-7 (enp…. To eth0)

How to change interface name in RHEL-7 (enp…. To eth0)

The main difference between RHEL7 and lower version is naming of Ethernet card. Here we change Ethernet card name like older version. Sometime application dependency also on “eth0” naming so here the process how to change name.

In my case the network interface name is look like this.

clip_image001[4]                         image

To apply this changes 1st we add some parameter in grub to push this parameter at boot time.

Add highlighted value in same line.

clip_image002[4]

Then name new menu in Grub boot loader with this new configuration using “grub2-mkconfig” command.

clip_image003[4]

Change LAN card name like this.

clip_image004[4]

Change DEVICE  or NAME value in this file to eth0

clip_image005[4]

Then rename interface name and reboot server. On the booting time select new one from grub list.

clip_image006[4]

Now you can see interface name changed.

Network setting(NIC)

Network setting(NIC)

Network setting(NIC)

How to set IP address, Hostname, enable disable NIC in RHEL 7.

To set IP address in RHEL 7 we have “nmtui” command. For setting IP address follow this steps.

[root@feenixdv7 ~]# nmtui

clip_image001[4]   clip_image002[4]


Then you can edit or put new IP address and more information like Gateway DNS…..

clip_image003[4]

For hostname follow bellow steps.

clip_image004[4]  clip_image005[4]

Then restart network service.

clip_image006

Set IP Address manual/DHCP(auto) with command line.

Set IP Address manually.


[root@ansible ~]# nmcli connection modify eth0 ipv4.method manual ipv4.addresses 192.168.1.100/24 connection.autoconnect yes
[root@ansible ~]# nmcli connection up eth0
[root@ansible ~]# ifconfig
enp0s3: flags=4163<UP,BROADCAST,RUNNING,MULTICAST>  mtu 1500
        inet 192.168.1.100  netmask 255.255.255.0

Set IP Address from DHCP(auto).


[root@ansible ~]# nmcli connection modify eth0 ipv4.method auto connection.autoconnect yes
[root@ansible ~]# nmcli connection up eth0
[root@ansible ~]# ifconfig
enp0s3: flags=4163<UP,BROADCAST,RUNNING,MULTICAST>  mtu 1500
        inet 10.224.24.246  netmask 255.255.252.0


Run Level in RHEL 7

Run Level in RHEL 7

How to set default target (default runlevel)

The conventional way used to change runlevel using /etc/inittab has become obsolete with Redhat Enterprise Linux version 7. As a result any Linux system using systemd system management daemon now relies on systemctl command to change runlevel or to be more precise to change the target. As a result any edits of /etc/inittab file will not take effect on RHEL 7. The term runlevel still exists on RHEL 7 and we cat check current runlevel using runlevel command: To list the predefined systemd run level target units :

List all currently loaded targets we can use the following command:

image


Comparison of SysV Run Levels and Target Units

The table below shows the system-state targets which are equivalents of run-levels


image

The default target unit is represented by the /etc/systemd/system/default.target file. This file is a symbolic link to the default target unit file currently set.

# ls -l /etc/systemd/system/default.targetlrwxrwxrwx. 1 root root 40 Oct 11 02:02 /etc/systemd/system/default.target -> /usr/lib/systemd/system/graphical.target Use the runlevel command to view the SysV runlevel.

# runlevelN 5 How to change run level or set run level  We have mainly these run level.·         poweroff.target

·         rescue.target
·         multi-user.target
·         reboot.target

In RHEL 7 we have “default” pointer who decide OS boot in which run level so 1st check the default value.              


image

Then set run level. In my example I set run level to “multi-user.target”

image


Note that changing the default target unit removes the existing default.target symbolic link and re-creates the symbolic link, which points to the new default target unit file.

Switch to particular run level.

This command quickly boot in “default” run level if currently not in. 
# systemctl default

 
For switch particular run level from current command prompt (like #init 5 command). 
image
Booting process of RHEL 7

Booting process of RHEL 7

Booting process in RHEL 7

image


Process step by step

  1. BIOS/UEFI

The machine is powered on. The system firmware (either modern UEFI or more old BIOS) runs a Power on Self-Test (P OST), and starts to initialize some of the hardware.


  1. Grub2

The system firmware reads a boot loader from disk, and then passes control of the system to the boot loader.On a Red Hat Enterprise Linux 7 system, this will typically be grub2.

Configured using: grub 2 – install

The boot loader loads its configuration from disk, and presents the user with a menu of possible configurations to boot.

Configured using:

  • /etc/grub .d/,
  • /etc/default/grub, and (not manually)
  • /boot/grub2/grub .cfg.


  1. kernel and initramfs lading.

After the user has made a choice (or an automatic timeout has happened), the boot loader loads the configured kernel and initramfs from disk and places them in memory. An initramfs is a gzip-ed cpio archive containing kernel modules for all hardware Necessary at boot, init scripts, and more.  On Red Hat Enterprise Linux 7, the initramfs Contains an entire usable system by itself.

  • Configured using: /etc/dracut.conf


  1. Kernel

– The kernel starts the systemd process with a process ID of 1 (PID 1)


  1. systemd

Systemd is the ancestor of all processes on a system.
– Systemd reads the file linked by /etc/systemd/system/default.target (for example, /usr/lib/systemd/system/multi-user.target) to determine the default system target (equivalent to run level). The system target file defines the services that systemd starts. systemd brings the system to the state defined by the system target, performing system initialization tasks such as:


1. Setting the host name
2. Initializing the network
3. Initializing SELinux based on its configuration
4. Printing a welcome banner
5. Initializing the system hardware based on kernel boot arguments
6. Mounting the file systems, including virtual file systems such as the /proc file system
7. Cleaning up directories in /var
8. Starting swapping

SELINUX: Use Boolean Settings

SELINUX: Use Boolean Settings

SELINUX: Use boolean settings to modify system SELinux settings.image


SELinux uses booleans to makes its policy more flexible. The basic policy is pretty strict but suits most requirements. But if you’ve got special needs, you can easily adjust it thanks to the SELinux booleans.


For a list of Booleans, an explanation of what each one is, and whether they are on or off, run the “semanage boolean –l” command as the Linux root user.

Here we can see all boolean values.

image


To see a particular boolean value we can use grep command.

image


In this example we try to access FTP account of any user when SELinux enabled.


Here I want to modify any file from “feenix” user home directory using FTP connection but we can’t.

image

User can’t modify his own file from home directory using FTP because the SELinux context not allow. We can see Boolean value of FTP “ftp_home_dir” which is set “off”.


image

Now I set “ftp_home_dir” Boolean value off to on.

image


After that user can modify his own file.


image

Note1:- You can use on or 1, off or 0 with the setsebool command.
Note2:- The -P option means Permanent. If you don’t use it, the boolean will restore its previous permanent or default configuration after the next reboot.

SELinux in RHEL7

SELinux in RHEL7

SELinux

Permissive mode is often used to trouble shoot issues.  In permissive mode, SELinux allows all interact ions,  even  if there  is no  explicit  rule ,  and  it  logs those  interactions it would have  denied in  enforcing  mode. This mode can be used to temporarily allow access to content that SELinux is restricting.  No reboot is required to go from enforcing to permissive or back again.

A third mode, disabled, completely disables SELinux. A system reboot is required to disable SELinux entirely, or to get from disabled mode to enforcing or permissive mode.

Important

Setting the default SELinux mode


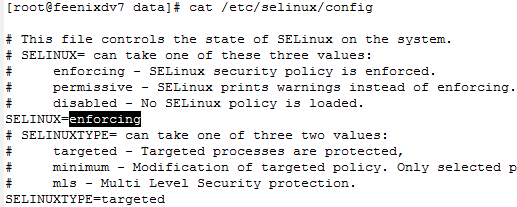
The configuration file that determines what the SELinux mode is at boot time is

/etc/selinux/config.


clip_image001

In older releases of Red Hat Enterprise Linux, the default SELinux mode was set in a file called /etc/sysconfig/selinux. In RHEL7, this file is a symbolic link that points to /etc/selinux/confi.

Changing the current SELinux mode

The setenforce command modifies the current SELinux mode:

clip_image002

Changing the SE Linux context of a file

There are two commands that are used to change the SELinux context  of  files: chcon and restorecon. The chcon command changes the context of the file to the context specified as an argument to the command. Often the -t option is used to specify only the type component of the context

Chcon should not be used to change the SELinux context of file s.  Mistakes can be made when specifying the context explicitly.  File contexts will be changed back to their default context if the system's file systems are relabeled at boot time.

Note:- with chcon apply context only for running session. If server restart or if any one run “restorecon” command then it’s again reset.

Here in this example I create a folder and performed bellow action

  • Check context with “ls –lZ”
  • Change context with “chcon” command
  • Then apply “restorecon” command


clip_image004

  • Here we can see the context reset by the “restorecon” command.

Defining SELinux default file context rules

The semanage fcontext command can be used to display or modify the rules that the restorecon command uses to set default file contexts. The res to recon command is part of the policycoreutil package, and semanage  is  part  of the policycoreutil-python package.

In this example we can see in the copy process context is overwrite with default directory context.

clip_image005

When we mv file then context is same, not replaced by other.

clip_image007

In this example we change context of all directory hierarchy ( including file[s]) permanently and after that check with “restorecon” command, it’s change or not.  

Here check context of directory with is “default_t”

clip_image008

Here change context with “semanage” command.

clip_image009

Then try to restore but not success because now it’s permanent context of directory.

               image