Check connected ports and RX TX details of NIC

Check connected ports and RX TX details of NIC

Check connected ports and RX TX details of NIC

Troubleshooting ports and services

  The ss command is used to display socket statistics.  It is similar to the net stat command.

clip_image002

Display the statistics for the eth0 interface.

clip_image003

Viewing network information with nmcli

To display a list of all connections, use nmcli con show. To list only the active connections, add the – -active option.

clip_image004


Understanding the Network Interface Device Naming in RHEL 7

Understanding the Network Interface Device Naming in RHEL 7

Understanding the Predictable Network Interface Device Names

The names have two character prefixes based on the type of interface:

en for Ethernet,

wl for wireless LAN (WLAN),

ww for wireless wide area network (WWAN).

The names have the following types:

Device Name Types

clip_image001

  • All multi-function PCI devices will carry the [f<function>] number in the device name, including the function 0 device.
Change Port Number With SELinux

Change Port Number With SELinux

Change port number with “semanage”

For the security purpose we change some default port number in Linux box.

  • For example all know SSH default port is 22 which is easily identify or targeted by any HACKER on the network so we simply change port number 22 to anything else.
  • But when SELinux enabled, you can’t start service on other port number.


  • You can see default port number with bellow command.

[root@feenixdv77 ~]# semanage port -l

SELinux Port Type              Proto    Port Number


afs3_callback_port_t           tcp      7001

afs3_callback_port_t           udp      7001

afs_bos_port_t                 udp      7007

afs_fs_port_t                  tcp      2040

afs_fs_port_t                  udp      7000, 7005

afs_ka_port_t                  udp      7004

afs_pt_port_t                  udp      7002

afs_vl_port_t                  udp      7003

agentx_port_t                  tcp      705

agentx_port_t                  udp      705

amanda_port_t                  tcp      10080-10083

amanda_port_t                  udp      10080-10082

amavisd_recv_port_t            tcp      10024 


  • grep ssh port number from list.

[root@feenixdv77 ~]# semanage port -l |grep ssh

ssh_port_t                     tcp      22


  • Here we can see default port is 22. Now we want to change default port for ssh as 2022.

[root@feenixdv77 ~]# semanage port -a -t ssh_port_t -p tcp 2022

ValueError: Port tcp/2022 already defined


  • For cross check, again grep port information.

[root@feenixdv77 ~]# semanage port -l |grep ssh

ssh_port_t                     tcp      2022, 22


  • Now we can run ssh service on both port number 22 and 2022


  • Same for HTTP/ Apache web service

[root@feenixdv77 ~]# semanage port -a -t http_port_t -p tcp 81

Apache configuration in RHEL 7

Apache configuration in RHEL 7

Apache configuration in RHEL 7

Apache configuration in RHEL 7

Check “httpd” installed or not.

[root@feenixdv77 ~]# yum install httpd

Loaded plugins: fastestmirror, langpacks

Loading mirror speeds from cached hostfile

Package httpd-2.4.6-31.el7.centos.x86_64 already installed and latest version


Start apache service and check status of service.

[root@feenixdv77 ~]# systemctl start httpd

[root@feenixdv77 ~]# systemctl status httpd

httpd.service – The Apache HTTP Server

   Loaded: loaded (/usr/lib/systemd/system/httpd.service; disabled)

   Active: active (running) since Tue 2016-12-20 09:22:07 EST; 8s ago

 Main PID: 9384 (httpd)

   Status: "Processing requests…"

   CGroup: /system.slice/httpd.service


In RHEL 7 in “httpd.conf” “VirtualHost” section not present so we can copy this format from bellow location and see the example page on browser.

[root@feenixdv77 manual]# cp /usr/share/httpd/manual/vhosts/examples.html  /var/www/html/


clip_image001


Then modify “httpd.conf” as per requirement.

clip_image002

clip_image003

Then create director “feenix” and one sample page “index.html” with some content.

clip_image004

Then restart service and open page on web browser.

clip_image005

clip_image006

We can customized log in bellow location.

clip_image007

Some advance configuration of apache web server.

Running several name-based web sites on a single IP address.

Your server has a single IP address, and multiple aliases (CNAMES) point to this machine in DNS. You want to run a web server for www.feenix.com and www.feenix.org on this machine.


# Ensure that Apache listens on port 80

Listen 80

<VirtualHost *:80>

    DocumentRoot /www/feenix1

    ServerName www.feenix.com

    # Other directives here

</VirtualHost>


<VirtualHost *:80>

    DocumentRoot /www/feenix2

    ServerName www.feenix.org

    # Other directives here

</VirtualHost>


Serving the same content on different IP addresses (such as an internal and external address).


The server machine has two IP addresses (192.168.1.1 and 172.20.30.40). The machine is sitting between an internal (intranet) network and an external (internet) network.


<VirtualHost 192.168.1.1 172.20.30.40>

    DocumentRoot /www/server1

    ServerName server.feenix.com

    ServerAlias server

</VirtualHost>


Mixed port-based and ip-based virtual hosts

The server machine has two IP addresses (172.20.30.40 and 172.20.30.50) which resolve to the names www.feenix.com and www.feenix.org respectively. In each case, we want to run hosts on ports 80 and 8080.


Listen 172.20.30.40:80
Listen 172.20.30.40:8080
Listen 172.20.30.50:80
Listen 172.20.30.50:8080

<VirtualHost 172.20.30.40:80>

DocumentRoot /www/The solution is easy, because we can simply add the new IP address (172.20.30.50) to the VirtualHost directive.

Listen 80

ServerName www.feenix.com

DocumentRoot /www/feenix1


<VirtualHost 172.20.30.40 172.20.30.50>

    DocumentRoot /www/feenix2

    ServerName www.feenix.org

    # …

</VirtualHost>


<VirtualHost 172.20.30.40>

    DocumentRoot /www/feenix3

    ServerName www.feenix.net

    ServerAlias *.feenix.net

    # …

</VirtualHost>


1-80

    ServerName www.feenix.com

</VirtualHost>


<VirtualHost 172.20.30.40:8080>

    DocumentRoot /www/feenix1-8080

    ServerName www.feenix.com

</VirtualHost>


<VirtualHost 172.20.30.50:80>

    DocumentRoot /www/feenix2-80

    ServerName www.feenix.org

</VirtualHost>


<VirtualHost 172.20.30.50:8080>

    DocumentRoot /www/feenix2-8080

    ServerName www.feenix.org

</VirtualHost>


Migrating a name-based vhost to an IP-based vhost

The solution is easy, because we can simply add the new IP address (172.20.30.50) to the VirtualHost directive.


Listen 80

ServerName www.feenix.com

DocumentRoot /www/feenix1


<VirtualHost 172.20.30.40 172.20.30.50>

    DocumentRoot /www/feenix2

    ServerName www.feenix.org

    # …

</VirtualHost>


<VirtualHost 172.20.30.40>

    DocumentRoot /www/feenix3

    ServerName www.feenix.net

    ServerAlias *.feenix.net

    # …

</VirtualHost>

VNC configuration on RHEL 7

VNC configuration on RHEL 7

VNC configuration on RHEL 7

clip_image002image

1st install prerequisite package on server.

  • tigervnc
  • tigervnc-server

[root@feenixdv77 system]# yum install tigervnc tigervnc-server –y

Create user for remote access.

[root@feenixdv77 ~]# adduser vncuser

[root@feenixdv77 ~]# passwd vncuser

Changing password for user vncuser.

New password:

BAD PASSWORD: The password is shorter than 8 characters

Retype new password:

passwd: all authentication tokens updated successfully.


Create service daemon for display 1 becaue in rhel 7 you can’t export display 0. 

[root@feenixdv77 ~]# cd /usr/lib/systemd/system

[root@feenixdv77 system]# ll vnc*

-rw-r–r– 1 root root 1744 Jun 10  2014 [email protected]

[root@feenixdv77 system]# cp [email protected] vncserver@\:1.service


Modify display file and replace <USER> tab with username “vncuser”

[root@feenixdv77 system]# vi vncserver@\:1.service

Before modification:-

clip_image003

                After modification:-

clip_image004

Reload service daemon which is created for display 1.

[root@feenixdv77 system]# systemctl daemon-reload


Set vnc password for “vncuser”. Must be 1st switch in “vncuser” after change password.

[root@feenixdv77 system]# su – vncuser

ABRT has detected 1 problem(s). For more info run: abrt-cli list

[vncuser@feenixdv77 ~]$ vncpasswd

Password:

Verify:

Now start service and check status.

 [root@feenixdv77 system]# systemctl start vncserver@\:1.service

[root@feenixdv77 system]# systemctl status vncserver@\:1.service

vncserver@:1.service – Remote desktop service (VNC)

   Loaded: loaded (/usr/lib/systemd/system/vncserver@:1.service; disabled)

   Active: active (running) since Thu 2016-12-15 20:06:13 EST; 7s ago

  Process: 30982 ExecStart=/sbin/runuser -l vncuser -c /usr/bin/vncserver %i (code=exited, status=0/SUCCESS)


Allow connection on firewall.

[root@feenixdv77 system]# firewall-cmd –permanent –add-service=vnc-server

success

[root@feenixdv77 system]# firewall-cmd –reload

Success


Now use “vnc viewer” for connect remote server.

clip_image005


LUN Creation using iSCSI

LUN Creation using iSCSI


Centralized Secure Storage using iSCSI


clip_image001

iSCSI is a block level Protocol for sharing RAW Storage Devices over TCP/IP Networks, Sharing and accessing Storage over iSCSI, can be used with existing IP and Ethernet networks such as NICs, Switched, Routers etc. iSCSI target is a remote hard disk presented from an remote iSCSI server (or) target.

Features of iSCSI Target

  1. Possible to run several iSCSI targets on a single machine.
  2. A single machine making multiple iscsi target available on the iSCSI SAN
  3. The target is the Storage and makes it available for initiator (Client) over the network
  4. These Storage’s are Pooled together to make available to the network is iSCSI LUNs (Logical Unit Number).
  5. iSCSI supports multiple connections within the same session
  6. iSCSI initiator discover the targets in network then authenticating and login with LUNs, to get the remote storage locally.
  7. We can Install any Operating systems in those locally mounted LUNs as what we used to install in our Base systems.

Master Server Setup

  1. CentOS release 6.1 (Final)
  2. iSCSI Target IP – 192.168.0.20
  3. Ports Used : TCP 860, 3260
  4. Configuration file : /etc/tgt/targets.conf

Installing iSCSI Target

[root@feenix ~]# yum install scsi-target-utils –y


Start the iSCSI Service

[root@feenix ~]# /etc/init.d/tgtd start


Configure it to start Automatically

[root@feenix ~]# chkconfig tgtd on


We need to add iptables rules for iSCSI if there is iptables deployed in your target Server. First, find the Port number of iscsi target using following netstat command.

[root@feenix ~]# netstat -tulnp | grep tgtd


LUN is a Logical Unit Number, which shared from the iSCSI Storage Server. The Physical drive of iSCSI target server shares its drive to initiator over TCP/IP network. A Collection of drives called LUNs to form a large storage as SAN (Storage Area Network). In real environment LUNs are defined in LVM, if so it can be expandable as per space requirements.

clip_image002

Creating LUNs using LVM in iSCSI Target Server

1st we need to create LVM partition then over the LVM LUN is created. For how to create LVM partition see the article (LVM).

Here we have bellow partition list.

clip_image003

And bellow is “lvdisply” output.

clip_image004 

Define LUNs in Target Server

Edit Target configuration file located at ‘/etc/tgt/targets.conf’

[root@feenix ~]# vi /etc/tgt/targets.conf


Put bellow lines in bottom of file.


clip_image005

Here in target you can put any name, in “backing-store” is LV partition full path.

Reload the configuration by starting tgd service

clip_image006


Next verify the available LUNs using the following command.

[root@feenix ~]# tgtadm –mode target –op show

clip_image007

Client Setup

In Client side, we need to install the package ‘iSCSI-initiator-utils‘.

[root@feenix ~]# yum list installed iSCSI-initiator-utils

clip_image008

After installing the package, we need to discover the share from Target server. The client side commands little hard to remember, so we can use man page to get the list of commands which required to run.

[root@feenix ~]# man iscsiadm

clip_image010

So for discover we use bellow command ( replace IP )

[root@feenix ~]# iscsiadm --mode discoverydb --type sendtargets --portal 192.168.0.20 –discover

 
clip_image012


To log-in use the below command to attach the LUN to our local System, this will authenticate with target server and allow us to log-in into LUN.

[root@feenix ~]# iscsiadm --mode node --targetname iqn.2014-07.com.feenixdv:tgt1 --portal 192.168.0.20:3260 --login
Logging in to [iface: default, target: iqn.2014-07.com.feenixdv:tgt1, portal: 192.168.0.20,3260]
Login to [iface: default, target: iqn.2014-07.com.feenixdv:tgt1, portal: 192.168.0.20,3260] successful.


Note: Use the login command and replace login with logout at end of command to disconnect.

After login to the LUN, list the records of Node using.

[root@feenix ~]#  iscsiadm --mode node


Display all data of a particular node.

[root@feenix ~]# iscsiadm –mode node –targetname  iqn.2014-07.com.feenixdv:tgt1 –portal 192.168.0.20:3260

clip_image014

Then list the drive using, fdisk

[root@feenix ~]# fdisk –l

clip_image015

For using these disk 1st need to create partition then make FS and after that mount these partition.

clip_image016


Set Hostname

Set Hostname

Modifying the system hostname

The host namectl command is used to modify this file and may be used to view the stat us of the system's fully qualified hostname.

image

Important:-The static hostname is stored in /etc/host name. Previous versions of Red Hat Enterprise Linux stored the host name as a variable in the /etc/sysconfig/network file .

MariaBD Installation And Management in RHEL 7

MariaBD Installation And Management in RHEL 7

MariaBD Installation And Management in RHEL 7

clip_image001

Required packages.

[root@feenixdv77 ~]# yum install mariadb-*

Start service and check status.

[root@feenixdv77 ~]# systemctl start mariadb

[root@feenixdv77 ~]# systemctl status mariadb

mariadb.service – MariaDB database server

   Loaded: loaded (/usr/lib/systemd/system/mariadb.service; disabled)

   Active: active (running) since Thu 2016-12-22 09:48:54 EST; 12s ago

  Process: 22914 ExecStartPost=/usr/libexec/mariadb-wait-ready $MAINPID (code=exited, status=0/SUCCESS)

  Process: 22832 ExecStartPre=/usr/libexec/mariadb-prepare-db-dir %n (code=exited, status=0/SUCCESS)

 Main PID: 22913 (mysqld_safe)

   CGroup: /system.slice/mariadb.service


Enable service in current run level.

[root@feenixdv77 ~]# systemctl enable mariadb

ln -s '/usr/lib/systemd/system/mariadb.service' '/etc/systemd/system/multi-user.target.wants/mariadb.service'


Run “mysql_secure_installation” script to setup secure setting.

[root@feenixdv77 ~]# mysql_secure_installation

/usr/bin/mysql_secure_installation: line 379: find_mysql_client: command not found


NOTE: RUNNING ALL PARTS OF THIS SCRIPT IS RECOMMENDED FOR ALL MariaDB

      SERVERS IN PRODUCTION USE!  PLEASE READ EACH STEP CAREFULLY!


In order to log into MariaDB to secure it, we'll need the current

password for the root user.  If you've just installed MariaDB, and

you haven't set the root password yet, the password will be blank,

so you should just press enter here.


Enter current password for root (enter for none):

OK, successfully used password, moving on…


Setting the root password ensures that nobody can log into the MariaDB

root user without the proper authorisation.


Set root password? [Y/n] Y

New password:

Re-enter new password:

Password updated successfully!

Reloading privilege tables..

 … Success!


By default, a MariaDB installation has an anonymous user, allowing anyone

to log into MariaDB without having to have a user account created for

them.  This is intended only for testing, and to make the installation

go a bit smoother.  You should remove them before moving into a

production environment.


Remove anonymous users? [Y/n] Y

 … Success!


Normally, root should only be allowed to connect from 'localhost'.  This

ensures that someone cannot guess at the root password from the network.


Disallow root login remotely? [Y/n] n

 … skipping.


By default, MariaDB comes with a database named 'test' that anyone can

access.  This is also intended only for testing, and should be removed

before moving into a production environment.


Remove test database and access to it? [Y/n] n

 … skipping.


Reloading the privilege tables will ensure that all changes made so far

will take effect immediately.


Reload privilege tables now? [Y/n] Y

 … Success!


Cleaning up…


All done!  If you've completed all of the above steps, your MariaDB

installation should now be secure.


Thanks for using MariaDB!


Main configuration file for mariadb is “/etc/my.cnf”. Using this file you can customize database.

[root@feenixdv77 ~]# cat /etc/my.cnf

[mysqld]

datadir=/var/lib/mysql

socket=/var/lib/mysql/mysql.sock

# Disabling symbolic-links is recommended to prevent assorted security risks

symbolic-links=0

# Settings user and group are ignored when systemd is used.

# If you need to run mysqld under a different user or group,

# customize your systemd unit file for mariadb according to the

# instructions in http://fedoraproject.org/wiki/Systemd


[mysqld_safe]

log-error=/var/log/mariadb/mariadb.log

pid-file=/var/run/mariadb/mariadb.pid


#

# include all files from the config directory

#

!includedir /etc/my.cnf.d


Login in database with user and password.              

[root@feenixdv77 ~]# mysql -u root -p

Enter password:

Welcome to the MariaDB monitor.  Commands end with ; or \g.

Your MariaDB connection id is 7

Server version: 5.5.41-MariaDB MariaDB Server


Copyright (c) 2000, 2014, Oracle, MariaDB Corporation Ab and others.


Type 'help;' or '\h' for help. Type '\c' to clear the current input statement.


MariaDB [(none)]> show databases;

+——————–+

| Database           |

+——————–+

| information_schema |

| mysql              |

| performance_schema |

| test               |

+——————–+

4 rows in set (0.01 sec)


MariaDB [(none)]> use mysql;

Reading table information for completion of table and column names

You can turn off this feature to get a quicker startup with -A


Database changed

MariaDB [mysql]> show tables;

+—————————+

| Tables_in_mysql           |

+—————————+

| columns_priv              |

| db                        |

| event                     |

| func                      |

| general_log               |

| help_category             |

| help_keyword              |

| help_relation             |

| help_topic                |

| host                      |

| ndb_binlog_index          |

| plugin                    |

| proc                      |

| procs_priv                |

| proxies_priv              |

| servers                   |

| slow_log                  |

| tables_priv               |

| time_zone                 |

| time_zone_leap_second     |

| time_zone_name            |

| time_zone_transition      |

| time_zone_transition_type |

| user                      |

+—————————+

24 rows in set (0.00 sec)


MariaDB [mysql]> show databases

    -> ;

+——————–+

| Database           |

+——————–+

| information_schema |

| mysql              |

| performance_schema |

| test               |

+——————–+

4 rows in set (0.00 sec)


MariaDB [mysql]> use test;

Database changed

Now in this example we perform this task.

  1. Create a database
  2. Create table in side database
  3. Insert data in table
  4. Show data from table.


  1. Create a database

MariaDB [test]> create database feenix;

Query OK, 1 row affected (0.08 sec)

MariaDB [test]> use feenix;

Database changed


  1. Create table in side database

MariaDB [feenix]> create table feenix(title varchar(40), name varchar(40), year INT);

Query OK, 0 rows affected (0.02 sec)


  1. Insert data in table

MariaDB [feenix]> insert into feenix (title,name,year) values(linux,rhel4,'2001');

ERROR 1054 (42S22): Unknown column 'linux' in 'field list'

MariaDB [feenix]> insert into feenix (title,name,year) values('linux','rhel4',2001);

Query OK, 1 row affected (0.01 sec)


MariaDB [feenix]> insert into feenix (title,name,year) values('suse','suse4',2005);

Query OK, 1 row affected (0.00 sec)


MariaDB [feenix]> insert into feenix (title,name,year) values('fedora','fedora25',2016);

Query OK, 1 row affected (0.01 sec)


  1. Show data from table.


MariaDB [feenix]> select * from feenix;

+——–+———-+——+

| title  | name     | year |

+——–+———-+——+

| linux  | rhel4    | 2001 |

| suse   | suse4    | 2005 |

| fedora | fedora25 | 2016 |

+——–+———-+——+

3 rows in set (0.00 sec)


Managing users in mariadb

Now we perform this task.

  1. Create a new user with password.
  2. Grant access for select, update, delete to the user.
  3. See the privileges of user.
  4. Grant access on specific table of database.
  5. Grant access on all table of database.
  6. Grant access on all database.


  1. Create a new user with password. % use for both access local and remote.

MariaDB [feenix]> create user eric@'%' identified by 'immad44';

Query OK, 0 rows affected (0.00 sec)


  1. Grant access for select, update, delete to the user and after that must be flush privileges;

MariaDB [feenix]> grant select,update,delete on feenix to eric@'%';

Query OK, 0 rows affected (0.00 sec)


MariaDB [feenix]> flush privileges;

Query OK, 0 rows affected (0.01 sec)


  1. See the privileges of user

MariaDB [feenix]> show grants for eric@'%';

+—————————————————————————————————–+

| Grants for eric@%                                                                                   |

+—————————————————————————————————–+

| GRANT USAGE ON *.* TO 'eric'@'%' IDENTIFIED BY PASSWORD '*0B9938E026930C6C71CE59ADB8671EB869C861AB' |

| GRANT SELECT, UPDATE, DELETE ON `feenix`.`feenix` TO 'eric'@'%'                                     |

+—————————————————————————————————–+

2 rows in set (0.01 sec)


  1. Grant access on specific table of database. In this example table name if feenix.

MariaDB [feenix]> grant select,update,delete on feenix.feenix to eric@'%';

Query OK, 0 rows affected (0.01 sec)


  1. Grant access on all table of database.

MariaDB [feenix]> grant select,update,delete on feenix.* to eric@'%';

Query OK, 0 rows affected (0.00 sec)

  1. Grant access on all database.

MariaDB [feenix]> grant select,update,delete on *.* to eric@'%';

Query OK, 0 rows affected (0.00 sec)


clip_image003


clip_image005


Backup with “mysqldump” command. Here feenix is database name.

[root@feenixdv77 ~]# mysqldump -u root -p feenix > /root/feenix.dump

Enter password:

[root@feenixdv77 ~]# ll /root/feenix.dump

-rw-r–r– 1 root root 1950 Dec 22 12:18 /root/feenix.dump
 

clip_image007


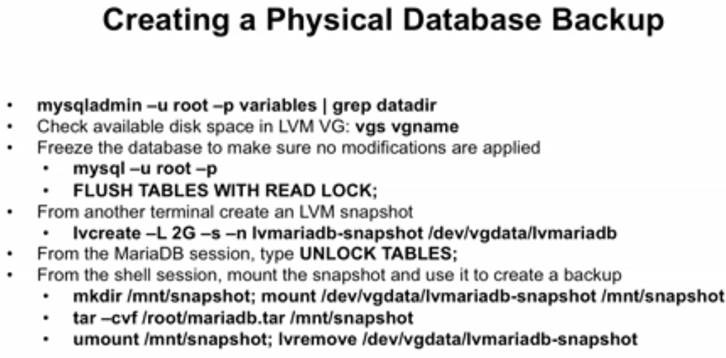
Direct take a backup of data directory. Use this command to see data directory.

[root@feenixdv77 ~]# mysqladmin -u root -p variables |grep datadir

Enter password:

| datadir                                           | /var/lib/mysql/         

Unable to change password for any User

Unable to change password for any User

If we are unable to change the password for any user or during login always asking for password and then force to change the password ( after changing automatic logout ) then check below points.

  • Reboot server in rescue mode(chroot…) and try to change the password or check “/etc/fstab” file.
  • If chroot not working and your partition in LVM then try to 1st activate LVM by below command.# lvm vgchange -a y
  • After that mount root partition ( / ) on any directory and check “/etc/fstab” file, maybe root partition ( / ) commented. uncomment it and reboot it.
  • After that reboot. Now you can change the password and also login into a server.