ACCESS CONTROL LIST (ACL)
We assign permission to the specific file to providing security, but still it has some limitation just like if we set 777 permission for a file, it set for all the user, but now if we have a need that just user1 can execute the file then it will be problematic so we cannot assign different permissions for different users so ACL comes in.
Now we set permission for file.txt
1st we create “file.txt” in “/tmp” directory then set ACL with “setfacl” command where m ( modify ) u (user name) then permission and location of a file.
How to see ACL list. We have “getfacl command”
Through ACL we give permission to ram user to modify the file.
Check how it’ work
It’s working.
To remove ACL
Analyzing past System performance
 Analyzing past System performance of a Linux server
Case
Today's date is 17th Dec 2012.
You are asked to check the System performance of a Linux server on 7th Dec,2012 between 1 AM to 5 AM.
# To check CPU utilization
# sar -u -f /var/log/sa/sa07 -s 01:00:01 -e 05:00:01
… # To check Memory status
#sar -r -f /var/log/sa/sa07 -s 01:00:01 -e 05:00:01
# To check Load average
#sar -q -f /var/log/sa/sa07 -s 01:00:01 -e 05:00:01
# To check Network status
#sar -n DEV -f /var/log/sa/sa07 -s 01:00:01 -e 05:00:01
Apache Monitoring
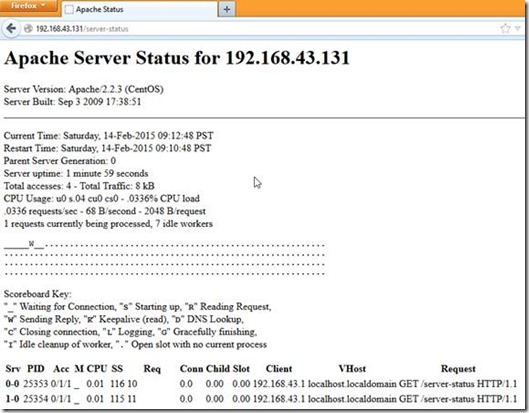
The Status module allows a server administrator to find out how well their server is performing. An HTML page is presented that gives the current server statistics in an easily readable form. If required this page can be made to automatically refresh (given a compatible browser). Another page gives a simple machine-readable list of the current server state.
The details given are:
- The number of worker serving requests
- The number of idle workers
- The status of each worker, the number of requests that the worker has performed and the total number of bytes served by the worker
- A total number of accesses and byte count served
- The time the server was started/restarted and the time it has been running for
- Averages giving the number of requests per second, the number of bytes served per second and the average number of bytes per request
- The current percentage CPU used by each worker and in total by Apache
- The current hosts and requests being processed
How do I configure mod_status to display Apache web server status?
Enable/uncomment mod_status.so module
# vi httpd.conf
Enable/uncomment “ServerSignature”
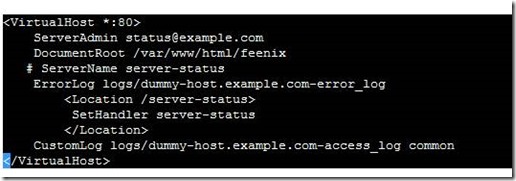
Create virtual section
Restart apache service
Access apache status in a web browser
Autofs
Autofs
Configuration for USB mass storage, DVD, CDROM, IDE hard drives. Now drives are automatically mounted when you try to access them. You can test it by inserting a cdrom, and cd /mnt/auto/autofs/cdrom . The CDROM is automatically mounted, and ls should show you the contents of the cd.
autofs uses /etc/auto.master and /etc/auto.misc file.
Example:-
We want to auto mount CDROM when we list “/mnt” directory(ls /mnt).
Put “/mnt /etc/auto.misc” line in “/etc/auto.master” file.
Then edit “/etc/auto.misc”
Restart service
Check directory
Create Partition
How to create a partition
CRON JOB
We put a small script in a cron job and change permission to execute.
Now modify cron job using “crontab –e”.
This script run every one minute.
As per script, we can see it’s updated in every one minute.
Some example:-
00 09-18 * * 1-5
- 00 – 0th Minute (Top of the hour)
- 09-18 – 9 am, 10 am,11 am, 12 am, 1 pm, 2 pm, 3 pm, 4 pm, 5 pm, 6 pm
- * – Every day
- * – Every month
- 1-5 -Mon, Tue, Wed, Thu, and Fri (Every Weekday)
00 09-18 * * *
- 00 – 0th Minute (Top of the hour)
- 09-18 – 9 am, 10 am,11 am, 12 am, 1 pm, 2 pm, 3 pm, 4 pm, 5 pm, 6 pm
- * – Every day
- * – Every month
- * – Every day of the week
Unable to change the password for any user
If we are unable to change the password for any user or during login always asking for password and then force to change the password ( after changing automatic logout ) then check below points.
- Reboot server in rescue mode(chroot…) and try to change the password or check “/etc/fstab” file.
-
If chroot not working and your partition in LVM then try to 1st activate LVM by below command.
# lvm vgchange -a y
- After that mount root partition ( / ) on any directory and check “/etc/fstab” file, maybe root partition ( / ) commented. uncomment it and reboot it.
- After that reboot. Now you can change the password and also login into the server.
Record Terminal Session in Linux
ttyrec is a tty(terminal) recorder in Unix like operating system & recorded data can be played back with the help of ttyplay command.ttyrec is just a derivative of script command for recording timing information with microsecond accuracy as well. It can record emacs -nw, vi, lynx, or any programs running on tty.
Installation on Ubuntu :
# sudo apt-get install ttyrec
Installation on RHEL 6.X / CentOS 6.X / Fedora
First Download the ttyrec rpm package using wget command and install using below mentioned yum command.
# yum localinstall ttyrec-1.0.6-1.i586.rpm
Now start Recording using ttyrec command :
Open the terminal type the below command and when you want to stop the recording type exit.
# ttyrec
When we run the above command recording of the terminal session will start and when you type exit, recording will be stopped and a file name “record” will be created in the current directory.
lsof command
# Who is running any command like VIM
With help of locating or where I find the path of command then use like.
lsof /usr/bin/vim
lsof /bin/bash
lsof /dev/cdrom
#who is access file in the directory
lsof +D /home
lsof +D /bin
#show with PID how many open files
lsof +p 3124
lfof -c httpd
lsof -c vim
#what file accessed by a user
lsof -u bnm
lsof -u ^root
# what process running on port
lsof -i :80
lsof -i :22
lsof -i @feenixdv.com
lsof -i TCP:80
lsof -i UDP:923
#List open file was deleted
lsof -a +L1 /
Rsync Command
Rsync Command
Rsync (Remote Sync) is a most commonly used command for copying and synchronizing files and directories remotely as well as locally in Linux/Unix systems.
Some advantages and features of Rsync command
- It efficiently copies and sync files to or from a remote system.
- Supports copying links, devices, owners, groups and permissions.
- It’s faster than scp (Secure Copy) because rsync uses remote-update protocol which allows to transfer just the differences between two sets of files. First time, it copies the whole content of a file or a directory from source to destination but from next time, it copies only the changed blocks and bytes to the destination.
- Rsync consumes less bandwidth as it uses compression and decompression method while sending and receiving data both ends.
Install rsync in your Linux machine
# yum install rsync
Copy/Sync Files and Directory Locally
[root@feenixdv]# rsync -zvh backup.tar /tmp/backups/
Copy/Sync a Directory on Local Computer
[root@feenixdv]# rsync -avzh /root/rpmpkgs /tmp/backups/
Copy/Sync Files and Directory to or From a Server
[root@feenixdv]$ rsync -avz rpmpkgs/ [email protected]:/home/
Copy/Sync a Remote Directory to a Local Machine
[root@feenixdv]# rsync -avzh [email protected]:/home/rpmpkgs /tmp/myrpms
Use of –include and –exclude Options
[root@feenixdv]# rsync -avze ssh –include 'R*' –exclude '*' [email protected]:/var/lib/rpm/ /root/rp
[root@feenixdv]# rsync -rav -e ssh –include '*/' –exclude='*.dump' [email protected]:/var/opt/data/flat/dba /opt/data/
Set the Max Size of Files to be transferred. Max file size is 200k, so this command will transfer only those files which are equal or smaller than 200k.
[root@feenixdv]# rsync -avzhe ssh –max-size='200k' /var/lib/rpm/ [email protected]:/root/tmprpm
Automatically Delete source Files after successful Transfer
[root@feenixdv]# rsync –remove-source-files -zvh backup.tar /tmp/backups/


![image_thumb[3] image_thumb[3]](https://feenixdv.com/wp-content/uploads/2016/11/image_thumb3_thumb.png)
![image_thumb[6] image_thumb[6]](https://feenixdv.com/wp-content/uploads/2016/11/image_thumb6_thumb.png)
![image_thumb[11] image_thumb[11]](https://feenixdv.com/wp-content/uploads/2016/11/image_thumb11_thumb.png)
![image_thumb[15] image_thumb[15]](https://feenixdv.com/wp-content/uploads/2016/11/image_thumb15_thumb.png)
![image_thumb[19] image_thumb[19]](https://feenixdv.com/wp-content/uploads/2016/11/image_thumb19_thumb.png)
![image_thumb[23] image_thumb[23]](https://feenixdv.com/wp-content/uploads/2016/11/image_thumb23_thumb.png)

